Explore sample project
In this tutorial, you will create a sample project and explore it.
Create a Sample Project
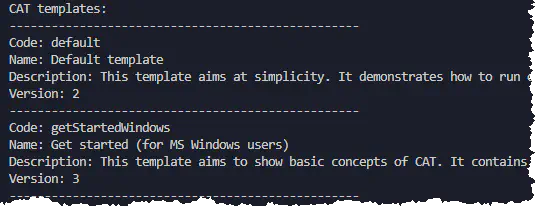
CAT offers templates for new projects. You can get their list with all details using get_project_templates function.
Create a new file project_templates.py with this code and run it:
# file: project_templates.py
from justcatit import cat as cat

templates = cat.get_project_templates(online=True, logging_level=cat.LoggingLevel.ERROR)
print('CAT templates:')
for template in templates:
     print ('-' * 50)
     print('Code: ' + template.TemplateCode)
     print('Name: ' + template.TemplateName)
     print('Description: ' + template.Description)
     print('Version: ' + str(template.Version))
print ('-' * 50)
Create a new file create_cat_project.py with this code. Change the path to directory where you want CAT to create the files:
from pathlib import Path
from justcatit import cat as cat

# change this to the path where you want to create the example project:
cat_project_path = r'D:\Lab\CatSampleProject'
Path(cat_project_path).mkdir(parents=True, exist_ok=True)

cat.new_project('CatSampleProject', cat_project_path, template='getStartedWindows', commented=True, wrap=False)
Adjust the arguments if needed. Arguments explanation:
name- Name for your new project, leave CatSampleProject for the purpose of the tutorial
path- Target directory where the new sample project should be created. Change it to whatever existing location on your file-system.
template- What project template you want (do not change this one for the purpose of this tutorial)
wrap- The getStartedWidnows template contains more files. This indicates you want them to be put into a directory (the directory will have the same name as the project name).
online- CAT will refresh the template from CAT online server. Omit this one if you are on a machine with no access to the Internet.
Once you run the file, CAT will create the sample files in the directory of your choice (we’ll explore them in this tutorial).
Explore and Run Tests
Open the generated folder in a file explorer:
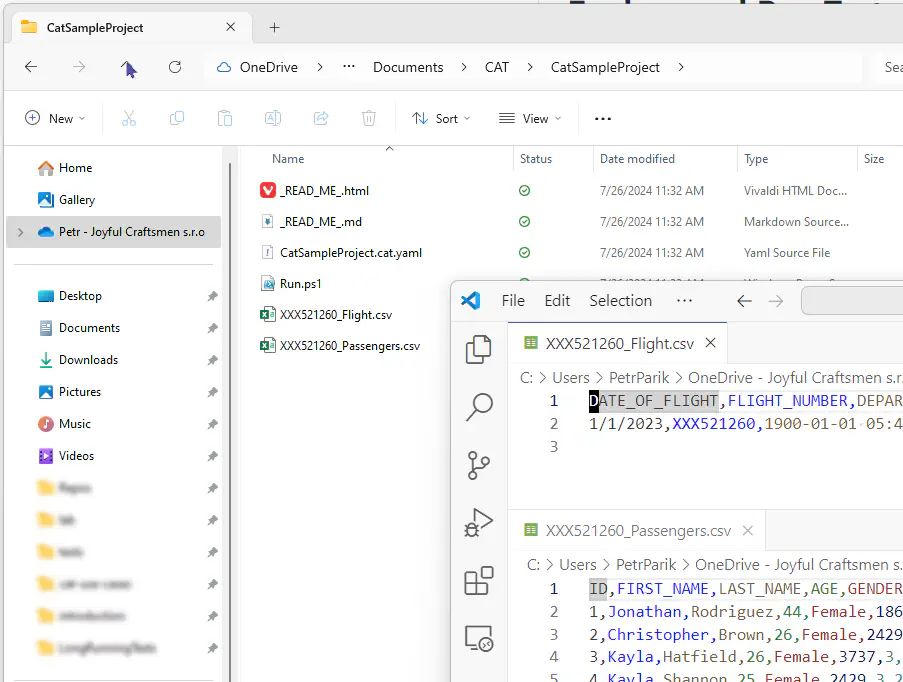 CAT generated two CSV files with sample data,
 .cat.yaml project file, a script for running the example from command-line and read-me files.
The CatSampleProject.cat.yaml file is the main file for CAT - we call it a CAT project file. It holds the definitions for the tests and for the data sources. Open the file in your favorite editor (the configuration uses YAML format).
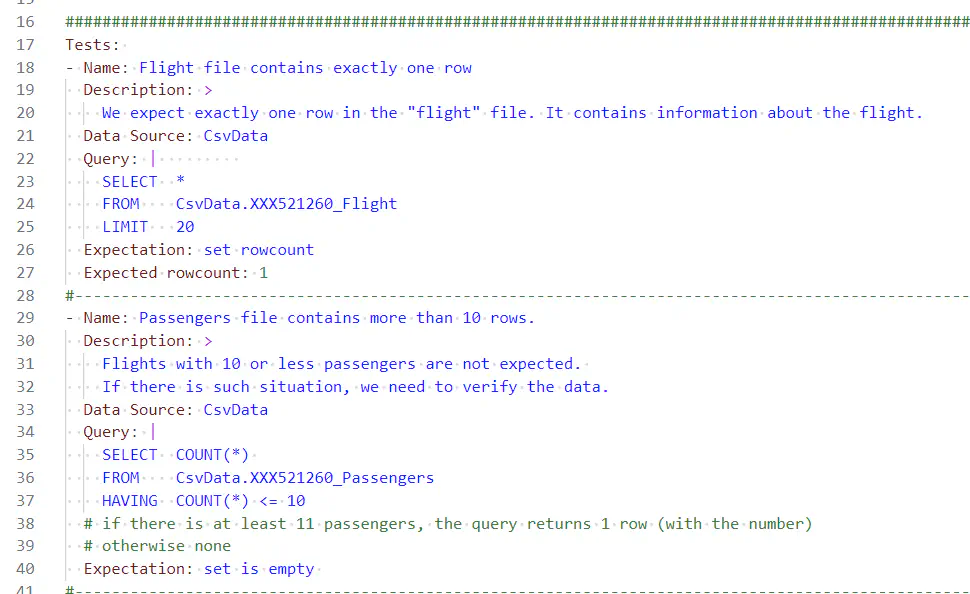 Notice how simple it is to add a new test. You only need a name for the test, one or two SQL or DAX statements and an expectation.
OK, so we created a project file, there are some test definitions there, it should test some data in the CSV files that are in the same folder. Now, let’s run it.
This is the magic of automated data tests. You can whenever run your tests again and again, using a single command. Create a new file run_cat_tests.py and put this content in it:
from justcatit import cat as cat
# change this to the path to where you created the project
cat_project_path = r'D:\Lab\CatSampleProject'
results = cat.invoke_project(cat_project_path)
for testResult in results.Results:
print(f'{testResult.TestResult}: {testResult.TestFullName}')
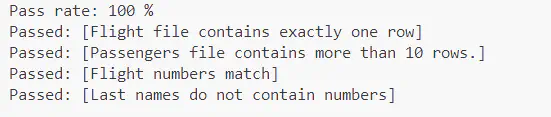
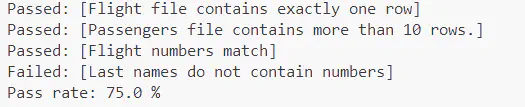
print(f'Pass rate: {results.PassRate} %')
When you are in a folder that contains only one .cat.yaml file, it is enough to simply run cat.invoke_project(), without any arguments.
You will get this result:
CAT also created a new MS Excel file with the results of the tests - it is in the TestResults folder next to your .cat.yaml file. This is because the CAT project file contains this: Output: xlsx. Explore the generated file.
A few things to note:
-
invoke_projectfunction has many optional arguments. You can e.g., turn off logging, run only tests with or without some tags etc. Check the documentation of the function. -
The object returned by
invoke_projecthas many interesting properties, like pass rate, number of passed/failed/other tests, list of all the tests including duration, test definitions (including SQL/DAX queries) etc. -
The object returned by
invoke_projectcomes from .NET, so things like pretty printing, intellisense etc. do not work on it. You can still use your debugger to explore all the properties it has. In future, if requested, we can adjust the function to return native Python stuff, including change of naming conventions from .NET to Python (all is in PascalCase now).
See Failed Test Details
Now, let’s experiment. Notice one of the tests checks for numbers in surnames. If any last name contains a number, the test should fail. So far it is passing, so let’s simulate we got wrong data. Open the XXX521260_Passengers.csv. On row three, change the surname from “Brown” to “Br0wn1”. Save the CSV files and re-run your run_cat_tests.py file.
py run_cat_tests.py
OK, now the test failed. You should see details in both command line and in generated MS Excel file:
As Python is a programming language, we expect you have an intention to do something about the results in a programmatic way. Instead of displaying all the details, CAT just returns objects. It is your task to process them. The default logging already outputs lots of information. You can also create outputs (like a JSON file with all the necessary information) that can be further processed in your code.
Anyway, to display info about failed tests, you can do this:
for testResult in results.Results:
    if str(testResult.TestResult) != 'Passed':
        print ('=' * 50)
        print(testResult.TestFullName)
        print ('-' * 50)
        print(testResult.Message)
        print ('=' * 50)
Output:
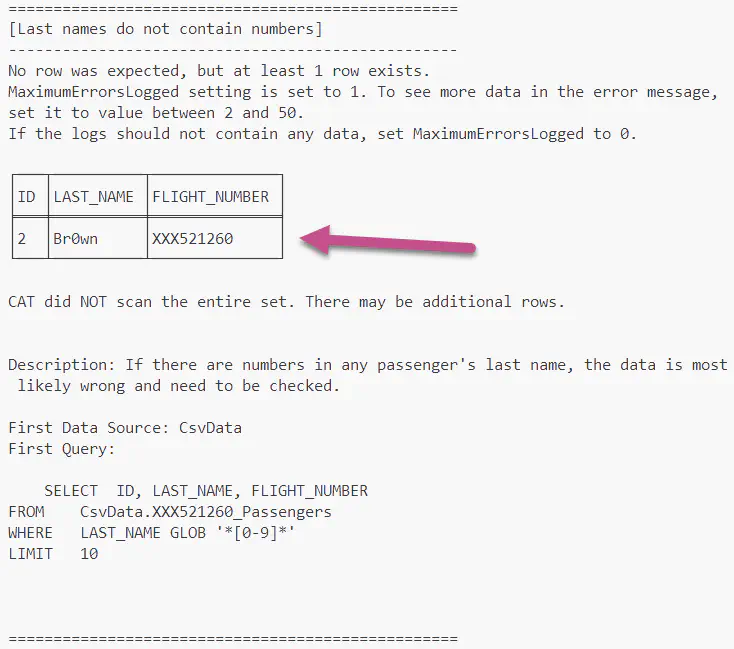
Notice the wrong data was found. Examine the entire output, including the details of the error message. For the failed test, you have all the details - the name and the description of the failed test, a sample of erroneous data and SQL statement(s) used to define the test. You immediatelly know what is wrong, where, and you have at your hands all the weapons you need to troubleshoot the problem in your data.
Summary and What Next
You now have CAT Python module installed. You created a sample project and are able to explore the tests it contains and details of a failed test. We did not explain much what the tests are actually about - we leave that to you as a home-work :-). Explore the structure of the CSVs and details of the tests (names, descriptions, SQL queries).
But there is one much more important thing:
Think about what everything can go wrong with your data. Did the yesterday’s pipeline run actually add any new data? Are there no new rows in your error-log table? Are all input files processed? Is your new Power BI meassure correct? CAT can automate these checks for you - you will have all your answers at hand any time with a single click of a button. Again and again.
The next step is: think of only one thing you’d like to check in your data.
Automate YOUR first test!
Alternatively, if you need more examples of tests, to get better idea what the tests may look like, create another sample project. There will be a new template named “AERO” (currently under construction) that contains many test examples. Explore that one to see what CAT can do.