Create first test
OK, I want my test against my data now.
On this page
If you followed the tutorial, you now have CAT Python module installed and you can create new projects from templates.
So, what do you need to do to create your first test against your data?
Create a new project
Create a new project based on default template. Here is a Python code that will create it for you. Feel free to tweak it:
from pathlib import Path
from justcatit import cat as cat

# change this to the path where you want to create the example project:
cat_project_path = r'D:\Lab\CatSampleProject'
Path(cat_project_path).mkdir(parents=True, exist_ok=True)

# "default" template is recommended for quick start for your project
cat.new_project('TestMyData', cat_project_path, template='default', commented=True, wrap=False)
Locate the generated .cat.yaml file on your file-system. We call that file CAT project file. Open it in your favourite text editor.
For editing the configuration, we highly recommend free Visual Studio Code with YAML extension.
Add a Data Source
First, locate this section in the project file:

Here you tell CAT where your data physically is.
First, give it a friendly name. Change “DWH” in the example to something short that describes what the data you are about to test represent (CRM, Accounting, …).
Second, in Provider:, set what is the “format” of the data. It must be one of those mentioned in the Provider’s documentation.
You also need to provide a Connection string. See examples in our documentation for the provider of your choice. Change server name, database name, port and other settings to match the connection settings of your database. Ask your database administrator for assistance, if needed.
Never store passwords in the connection string. CAT supports “environment variables”. Anything in your connection string (or the entire connection string) can be “hidden” in an environment variable. It may look like:
Connection string: "%MY_ENVIRONMENT_VARIABLE_NAME%"
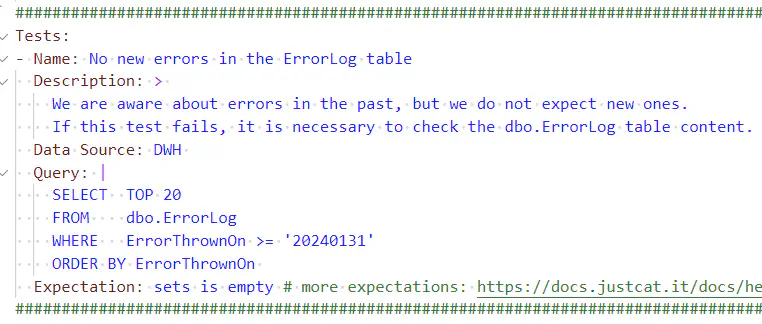
Automate a Test
And now the fun part - let’s add a test. Once you have your data sources configured, you’ll be doing only this - adding new tests.

Name: Provide a descriptive name for your test.
Description: is optional, but highly recommended - if the test fails in 3 months time (such things really happen) - what would you remind yourself to do to fix it?
Data Source: here you specify that friendly name you gave to your data source
Query: put your SQL/DAX statement
Expectation: we recommend to start with set is empty (test passes when your SQL does not return anything) or set is not empty (test passes when your SQL returns at least one row) expectations - they are intuitive and super simple. You’ll learn more of them later.
Run the Test
Run the test and explore the results. If the result is Passed or Failed, congratulations! You just fully automated your first test against your data. If not, contact us (you may use Feedback button on this page), we’ll help you out.
from justcatit import cat as cat

# change this to the path to where you created the project
cat_project_path = r'D:\Lab\CatSampleProject'

results = cat.invoke_project(cat_project_path)

for testResult in results.Results:
    print(f'{testResult.TestResult}: {testResult.TestFullName}')
print(f'Pass rate: {results.PassRate} %')
In this introduction, you learned how to install and use CAT PowerShell module. You created and ran a sample project and you created your very first test. What now?